A Prisoner Of Windows, Part 1
We who use Linux desktops sometimes forget that most of our peers do not have our luxuries. At times, we find ourselves forced to devolve, and use a Windows desktop to do our work. When we do, we pine for the vast variety of tools we had under Linux and curse the clumsiness of the software prison that we are locked into.
But, there is hope for us prisoners of Windows. If our Microsoft Windows environment is network-enabled and if we can connect to a suitably configured network-enabled Linux box, we can still work on our platform of choice. So, how do we free ourselves? We give ourselves secure remote access to Linux, both at the command line and at the GUI level with a combination of standard Linux tools and a couple of Open Source applications for Windows.
My goal is to show you how to let a Windows desktop user log on to and run both commandline and GUI applications on a remote Linux system, with Windows handling all the presentation (and only the presentation). I will show you how to set up OpenSSH on a Linux system, to provide secure access and facilitate GUI interaction, and how to configure and use an Open Source SSH client (PuTTY) and an Open Source X server (Xming) on Windows. With these tools, any Windows captive can securely and easily escape to a Linux system and work on it remotely as if it were the only system they were on.
The escape plan: Setting up the OpenSSH Server
Before you can release that poor prisoner of Windows, you have to prepare a safe haven on a Linux system. You will need to set up an OpenSSH server on a Linux system and make it available to the outside world.
As most Linux distributions come with (or make available) a native version of OpenSSH, I will not cover the distribution-specific details of installation from native package, or the tedious technical details of installation from source. Instead, I will assume that you already have located and installed the appropriate package, and are ready to configure it.
Configuring the OpenSSH Server
You can find the default configuration file for the OpenSSH server in /etc/ssh/sshd_config. This text file contains three types of text: blank lines, comments (which start with a #) and lines of keyword/argument pairs which control the behaviour of the sshd server. You only need concern yourself with the keyword/argument lines, as sshd ignores comments and blank lines.
The default values for the sshd parameters (the values assumed when a keyword is not specified) are usually adequate for general SSH use, I'd like you to explicitly set the values of four of the parameters to ensure your Windows captive's access to the Linux safe haven.
Specifically, I'd like you to set
- AllowTcpForwarding to yes
- X11Forwarding to yes
- X11DisplayOffset to 10
- X11UseLocalHost to yes
- AllowTcpForwarding controls whether or not the ssh daemon will permit generic TCP forwarding. This feature permits SSH clients to direct selected network traffic through the SSH tunnel so that it moves securely from client to server (or vice versa) unimpeded by network firewalls. While this parameter defaults to "yes", you may find that the default sshd_config explicitly sets it to "no", and as we wish to ensure that TCP forwarding is permitted, you need to change it.
- X11Forwarding controls whether or not the ssh daemon will explicitly handle SSH forwarding of X11 data streams. This parameter defaults to "no" and you should explicitly set it to "yes" in the default sshd_config, in order to permit your Windows detainee to easily interact with Linux GUI applications. Note that, with AllowTcpForwarding enabled, X11Forwarding is a convenience, and is not absolutely necessary for X11 tunnelling.
- X11DisplayOffset specifies the starting DISPLAY number for SSH-transported X11 datastreams. This parameter should be set to a value higher than the highest 'real' (locally attached) X11 display on the Linux system in order to avoid interfering with the local GUI users. The default value for this parameter is 10, but you may wish to assign a different value, depending on the amount of use your Linux system gets.
- X11UseLocalHost controls whether SSH should "bind" X11 forwarding to the local loopback address or to the less secure wildcard address. If bound to the local loopback address, some older X11 clients may not function properly. The default for this parameter is "yes" (which is the value I'd like you to explicitly set it to), but your initial configuration file may have overridden this value.
Of the above four parameters, two are typically unnecessary (having defaulted to sane values anyway), and one of the other two may be redundant. Specifically, X11DisplayOffset and X11UseLocalhost default to sane values, and you don't need to alter sshd_config for them unless the default sshd_config has already overridden the defaults with less friendly values. Also, AllowTcpForwarding and X11Forwarding offer clients similar abilities; if AllowTcpForwarding is already specified, then it is simple (but not obvious) for a client to perform X11 forwarding without the X11Forwarding option. If X11Forwarding alone has been set, our incoming clients can forward X11 sessions, but not other types of data stream. For your prisoner of Windows, you want to allow access to all network data streams (hence the explicit AllowTcpForwarding setting), and painlessly permit him to forward X11 specifically (hence the explicit X11Forwarding setting).
Once you've made the appropriate changes to your /etc/ssh/sshd_conf file (see Figure 1), you save your editing efforts and continue to the next step: generating your SSH server keys.
Generate your Server Keys
SSH manages its security through the use of multiple encryption methods. The initial conversation between client and server uses "public key" cryptography for user authentication and negotiation of communications parameters, and then uses "shared key" cryptography for the actual data transfer. This shared key is generated at the time the client connects to the server, and is transferred over the wire in an encrypted form using "public key" cryptography to conceal its value.
Before you can use the ssh server, you must generate encryption keys for it to use in its "public key" conversation. Some Linux distributions arrange for the first execution of the ssh server to build these keys, but some do not. In the next steps, you will explicitly build three sets of keys (one set for each method of conversation that ssh understands), and place these key sets in the standard files.
As root, first execute the ssh-keygen command to build your rsa1 key into file /etc/ssh/ssh_host_key:
- /usr/bin/ssh-keygen -t rsa1 -f /etc/ssh/ssh_host_key -N ''
Next, again execute the ssh-keygen command, but this time to build your dsa key into file /etc/ssh/ssh_host_dsa_key:
- /usr/bin/ssh-keygen -t dsa -f /etc/ssh/ssh_host_dsa_key -N ''
Finally, execute the ssh-keygen command for a third time, this time to build your rsa key into file /etc/ssh/ssh_host_rsa_key:
- /usr/bin/ssh-keygen -t rsa -f /etc/ssh/ssh_host_rsa_key -N ''
With these commands, you have given your ssh daemon both ears and a voice through which your Windows captive can communicate with the Linux environment.
Start the OpenSSH server
Finally, it is time to start your OpenSSH server, which will use the configuration and key files you've prepared to conduct conversations with the outside world. If your system starts the ssh server automatically, you can just "signal" it to have it reread it's configuration. To do this, as root, you
- /bin/kill SIGHUP `cat /var/run/sshd.pid`
to send the SIGHUP signal to the currently running ssh daemon. On the other hand, if your system hasn't started the ssh daemon, you (again as root) can run the sshd server with a simple command:
- /usr/bin/sshd
Now you have completed the extra Linux configuration, created a secure door to your Linux "safe haven" (did you remember to reset the security system? If not, you may need to adjust your firewall to permit ssh connections) and have taken the first step to freeing that prisoner of Windows from his oppressive confines. Of course, your Windows captive will require an account on the Linux system, defined with the standard tools and methods of your distribution. Because your Windows captive will initially log in to the Linux system using his assigned Linux userid and password, you must build him an account that permits commandline logins using the system standard userid validation. Later, once your Windows prisoner has established his foothold into your safe haven, you have the option of disabling the password, and requiring his login only through the security facilities of ssh.
A foot out the door - Linux Commandline with PuTTY
So, you've established your safe haven. Now, you have to release your detainee. This will take the installation of some software onto the prisoner's Windows system. Fully locked down systems (where you can't even run unapproved programs from floppy disk or USB "thumb drive" memory stick) are the worst confines. You can't do anything about these dungeons without the co-operation of the Windows system administrator. Lets hope that your Windows captive is not locked in one of these "solitary confinement" cells, and instead has a little latitude in his actions.
The first step to freedom from this jail is to install the "PuTTY" SSH client application for Windows. "PuTTY" is a Windows GUI application maintained by Simon Tatham, and released (both in executable form, and in source code) under a BSD-like open source licence. When installed, it takes about 2800K of disk space, and establishes a couple of (not absolutely required) Windows Registry entries. The 6 programs in the PuTTY suite provide the client tools necessary for our captive to escape to our Linux safe haven.
-
PUTTY.EXE This is the SSH client program used for "commandline" access to outside systems, and is a replacement for the telnet client command. PUTTYGEN.EXE This program builds client "public key" keys, for use in identifying the client to the ssh server. PAGENT.EXE This tool is a "key agent" that allows the Windows user to "make available" selected keys on an ongoing basis to PuTTY applications. This is a convenience (to reduce the number of times a user must enter key information), and not a requirement. PSCP.EXE An ssh replacement for the rcp client command. PSFTP.EXE An ssh replacement for the ftp client command. PLINK.EXE This tool is an SSH client program (like PUTTY.EXE) suitable for use in automated processes (like .BAT and .CMD files). Other GUI programs (like Xming) also use PLINK.EXE to establish their own ssh connections to the target systems.
Your first task will be to configure PuTTY to connect to the Linux system. This will be a simple connection that depends on Linux userid and password confirmation; it will not (yet) use the power of ssh public key cryptography to give you immediate access to the Linux system. Let's save that little flourish for some other time.
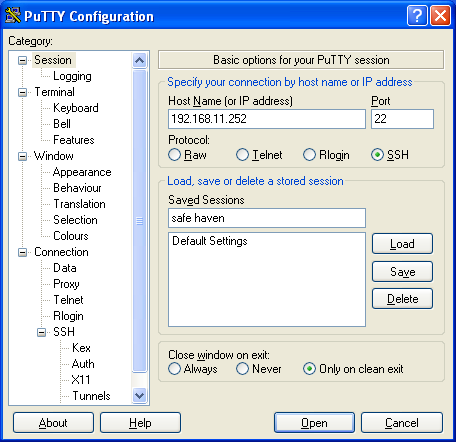
So, from the Windows Start -> All Programs -> Putty menu, you now run PuTTY. The PUTTY.EXE program will start, and present you with a PuTTY Configuration window. Because this is your first time running PuTTY, and you have not yet set any configuration information, the window will be mostly empty. On the left hand side of the window, you will see a tree of Putty options, and on the right, the settings for the "Session" option. It is here that you provide the basic information necessary to get out of Windows and into your Linux commandline.
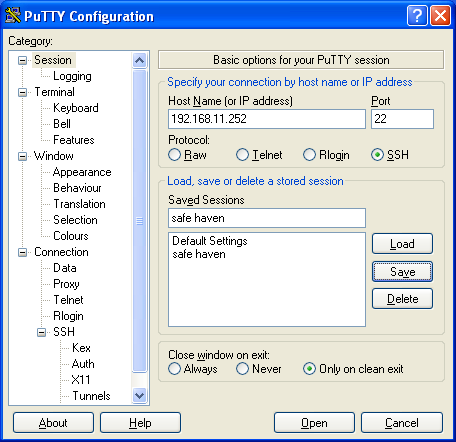
In the Host Name field, you enter the DNS name or IP address of your Linux system. If you intend to return to this system (and you likely do), you can save the session information by entering a meaningful name in the Saved Sessions entry box, and selecting the Save button (see Figures 2a-2c). From this point on, your poor Windows prisoner can launch PuTTY, select and Load the Linux system session information from the list of Saved Sessions, and then select the Open button to immediately connect to the Linux safe haven system.
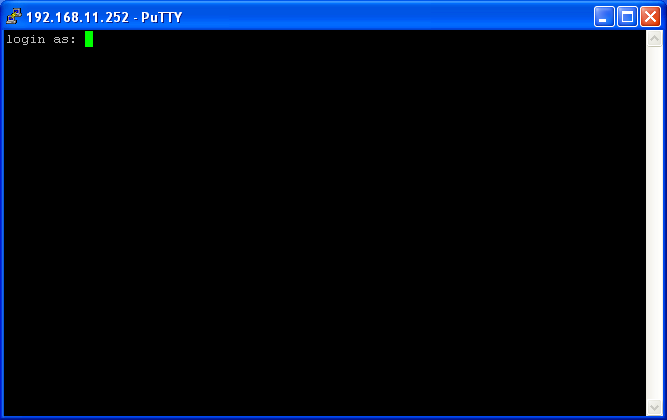
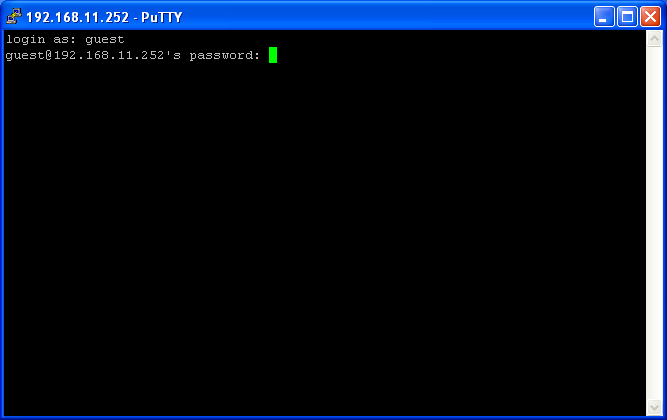
Because PuTTY has never conversed with your Linux system before, it will show you the SSH key that the "Safe Haven" OpenSSH server provided (see Figure 3a), and ask you if you trust it. Answer "Yes" to complete the SSH handshake with the Linux system; if you answer "No" instead, then PuTTY continue with the handshake, but will not remember that you trust the Linux system, and if you answer "Cancel", Putty will abandon the connection altogether. Once this is done, it is now just a simple matter of completing the text-based login with your Linux userid and password (Figures 3b-3d), and you are done; the world of your Linux system awaits you, from a character-based interface (like in Figure 3e).
Free as a Bird - Linux GUI with Xming
But, a character-based interface is just "a shadow on the wall" to our GUI-acquainted eyes. While it is possible to use Linux this way, you likely prefer a less limited interaction, and that means X. Your Windows captive will better enjoy his freedom if you install the "Xming" X server, and that is your next step.
Xming is a port of the X.org X11 server to the Windows environment, currently maintained by Colin Harrison who took over from Alexander Gottwald. The latest release of Xming (at the writing of this article) is based on the new X.org X11R6.9 X server, and (like PuTTY) is released under an Open Source licence
Unlike PuTTY, however, the Xming install comes in multiple parts. There are two different X servers (one that uses OpenGL for rendering, and one that uses the much slower Mesa renderer), and one font package. You will need to install one of the two X servers, and some of the fonts from the font package. The installations are very straight forward, consisting of a familiar graphical installation wizard that takes care of all the mechanics of the install. Configuration (at this point) is not an issue; the basic Xming services that the install builds will suit our needs perfectly. With the OpenGL server and all the fonts (both obligatory and optional) installed, Xming takes about 45Mb of disk space (and a few optional registry entries) to install.
Once you have the X server and fonts installed, you will start a "rootless" Xming server by traversing the Windows Start -> All Programs -> Xming menu, and selecting the Xming option. This will start the X server, and leave you with an Xming icon (see Figure 4) in your toolbar. Xming does not come with the xauth or xhost commands (although they are available through an add-on package), and the X server does not, by default, permit unauthenticated remote applications to connect to and use the display. You could add in some of the add-on toolset in order to get the X authority tools, but instead, I'll show you how to use the X11 forwarding capabilities of your OpenSSH server and PuTTY client to cause your remote X11 applications to appear as local applications to Xming. So, back to PuTTY we go.
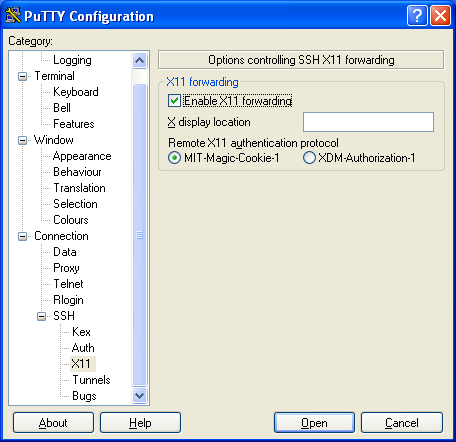
When you launch PUTTY.EXE, you are always first presented with a configuration window. When you first connected to your Linux "safe haven", you (hopefully) saved the PuTTY configuration for that connection. You now want to Load that Saved Session, and alter it a bit. If you scroll down the "Category" list on the left hand side of the configuration window, you will come to a leaf titled "X11;quot;. You will select this leaf, and alter it's settings (see Figure 5a) to Enable X11 Forwarding. At this point, you should scroll back to the Sessions leaf, and Save the altered definition before you Open the session to your Linux system.
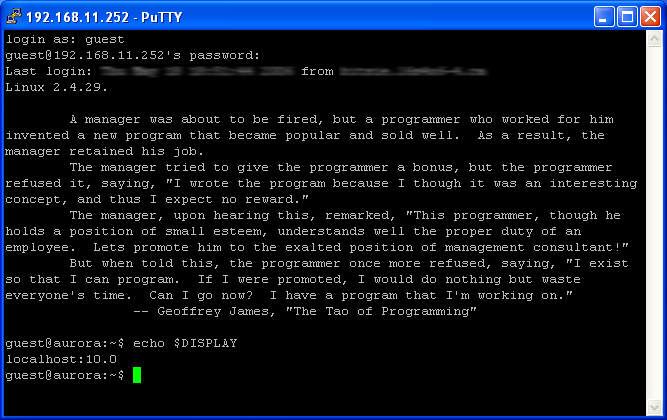
When you do open the session, you will find that, on the Linux side of the connection, the $DISPLAY environment variable is now set (see Figure 5b) to a display on the Linux system. This display doesn't actually physically exist; it is one of the X11 tunnels that you permitted with your OpenSSH X11Forwarding and X11DisplayOffset settings. Your Linux X client applications will interact with OpenSSH instead of a real X server, and OpenSSH (on Linux) will relay the X protocol messages to PuTTY (on Windows), which will then pass them on to your Xming X server running on Windows. The X server will respond in reverse, passing data to your PuTTY client, which passes it back to OpenSSH to be finally handed over to the X client application. It is a round-about route to be certain, but it does provide several advantages:
- it provides a layer of security around your GUI traffic,
- it gives your X client applications an assured route to your X server, guaranteeing that they will not be stopped by firewall rules or routing problems that may inadvertently block the X protocol traffic, and
- it eliminates the need to use the X authorization tools (like xauth or xhost) because, to your X server, all the X protocol traffic is local traffic.
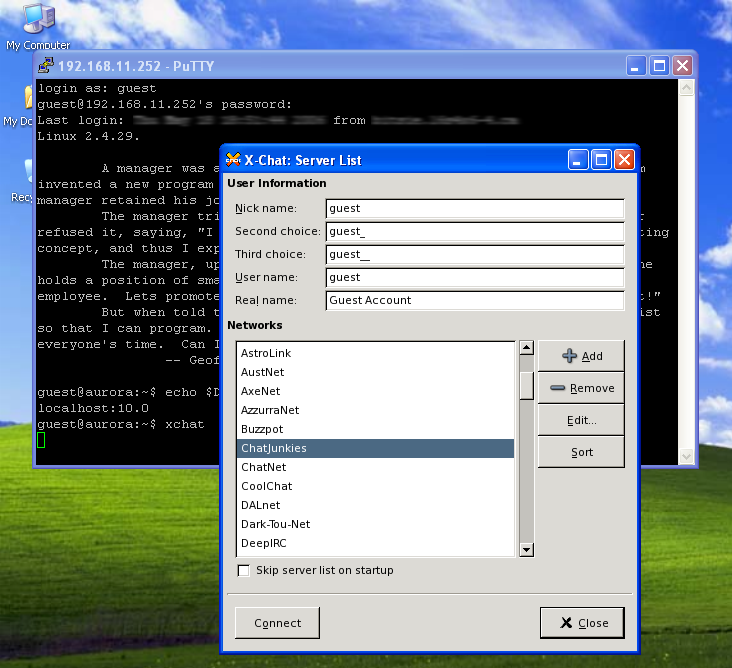
As Figure 5c shows, from this PuTTY and Xming setup, you can run even the most sophisticated X application. Truly, almost any X application that is available to you in Linux can be run this way. Only those applications that require services not implemented in the Xming server (such as OpenGL when you use the Mesa version of Xming) cannot be run this way.
A Person In Danger
With this, I've met my goal and given you the tools to free your prisoner of Windows. Now, all the facilities of Linux are open to him, commandline and GUI tools alike. Your former prisoner no longer needs to curse the confines of his local working environment, and can luxuriate in the freedom of the remote Linux system he accesses.
The I Ching says "A person in danger should not try to escape at one stroke. He should first calmly hold his own, then be satisfied with small gains, which will come by creative adaptations." We've given our Prisoner of Windows a small gain achieved by a creative adaptation. The next steps you take will lead to his complete escape.
Figures
- Figure 1 - Sample /etc/sshd/sshd_config file
-
AllowTcpForwarding yes
X11Forwarding      yes
X11DisplayOffset   10
X11UseLocalhost    yes
- Figure 2a: Initial (empty) PuTTY Configuration

- Figure 2b: Addressing the Linux "Safe Haven"
- Figure 2c: Saved "Safe Haven" address
- Figure 3a: PuTTY asks if you trust the target system

- Figure 3b: Logging on to Linux - your user ID please
- Figure 3c: And your password, if you dont mind
- Figure 3d: Past the security perimeter, to the commandline

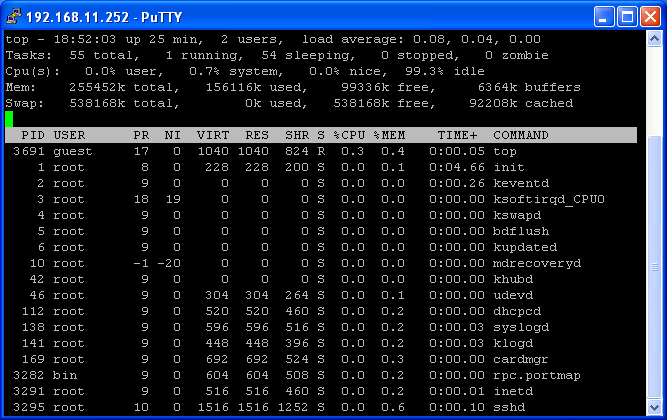
- Figure 3e: Doing useful work at the Linux commandline
- Figure 4: The Xming Icon

- Figure 5a: Enable PuTTY X11 forwarding
- Figure 5b: Linux recognizes X11 forwarding
- Figure 5c: Linux GUI application, now showing here
Resources
| OpenSSH SSH server (Linux) |
http://www.openssh.com/ |
| PuTTY SSH client (Windows) |
http://www.chiark.greenend.org.uk/~sgtatham/putty/ |
| Xming X server (Windows) |
http://www.straightrunning.com/XmingNotes/ |
| X Foundation (X server reference site) |
http://www.x.org/ |
| Remote X Apps mini-HOWTO (Linux Documentation Project) |
http://www.tldp.org/HOWTO/text/Remote-X-Apps |
| Usenet Newsgroup for SSH matters (the authors of PuTTY sometimes hang out here) |
news:comp.security.ssh |
| Usenet Newsgroup for general X Window system matters | news:comp.windows.x |
| Usenet Newsgroup for Linux X Window system matters | news:comp.os.linux.x |