A Prisoner of Windows, Part 2: Pane Relief
When we last met1, we had freed our prisoner of Windows so that all the commandline and GUI facilities of a remote Linux system were available to him. But, while our prisoner of Windows is now free to wander the Linux world, he is still bothered by a discontinuity; our Windows user still has the headache of having to manually enter his userid and password into every Linux box he has access to, and he must log directly on to his Linux system to run Linux-based applications.
Well, I have a simple prescription that can cure that syndrome. With a small change to the user's Linux configuration and a few simple Windows tools, we can relieve our Windows user of his "pane" and give him Windows desktop icon access to his Linux-based applications.
First, we will use the PuTTYGen program on Windows to build a pair of keys, and use the Pagent program on Windows to make the "private" key of this pair available to the PuTTY and Plink programs. With this, our Windows user will have only one password to remember and enter rather than several, and the password will be associated with his PuTTY keys, not with the Linux logins.
Next, on the Linux side, we will take the "public" key of this PuTTY key pair and make it available to OpenSSH. With PuTTY using the private key and OpenSSH using the corresponding public key, our Windows user will authenticate and be given access to the Linux system. At this point, we will also look at disabling the OpenSSH userid/password logon so that our Linux system only accepts SSH logons that use preregistered keys.
Finally, we will use Plink on our Windows machine to create Windows desktop icons that directly invoke Linux applications. These icons will use our SSH configuration to individually connect to the Linux system and initiate individual remote X applications, which will then (courtesy of PuTTY and Xming) open their windows on the user's Windows desktop.
So, let's see if we can't get our Windows user some quick, long-lasting "pane" relief, shall we?
Filling the prescription
Ssh can authenticate an incoming connection in two ways: it can check for a valid Linux userid/password combination, and it can check for a valid, pre-stored authentication key. Depending on the options we use to configure our OpenSSH server, one or both of these authentication methods may be available to us.
Generate your Private/Public Keypair
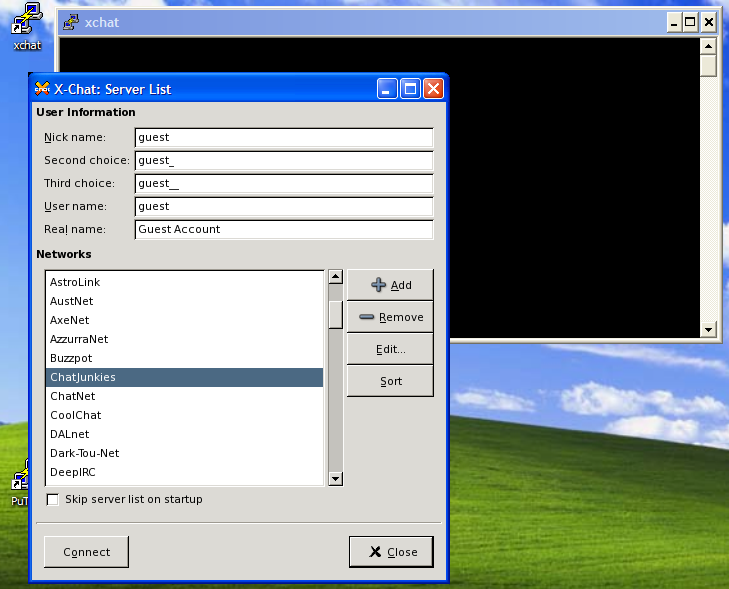
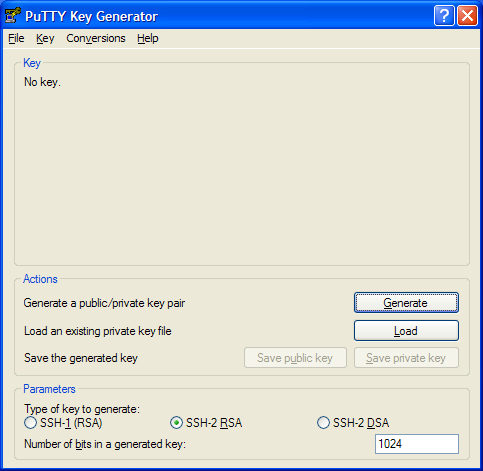
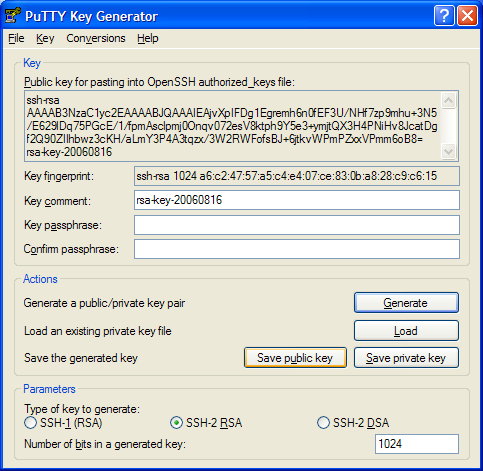
We start off by traversing the Windows Start ⇒ All Programs ⇒ PuTTY2 menu, and selecting the PuTTYGen option. This opens the PuTTYGen (the PuTTY Key Generator, see Figure 1a) window from which we will generate our SSH key pair. The window is divided horizontally into three panes; the Key pane at the top, the Actions pane in the centre, and the Parameters pane at the bottom. We start with the Actions pane by selecting the "SSH-2 RSA"radio button, and entering a number (1024 is good) in the "Number of bits in a generated key" entrybox. Together, these parameters will cause PuTTYGen to build a 1024-bit RSA keypair for use with SSH2.
Next, click on the Generate button. The upper part of the Key pane will tell you that it is generating a new key, and ask you to waive your mouse around a bit. Moving the mouse randomly helps the key generator build random numbers which it will use as seed values for your new key pair. A green progress bar will show you how long to wiggle your mouse around; when the bar reaches the far right hand side of the window, you can stop moving the mouse. After a bit, PuTTYGen will advise you that it is constructing your keypair, and will again give you a green progress bar. When this bar reaches the right hand side of the window, your keys will be ready.
You will actually have two keys, a private key that you will password protect and store on your Windows system, and a public key that you will copy on to your Linux system. This public key can be used on as many systems as you wish, but it is forever paired with the one private key that you will keep on Windows. When PuTTYGen has finally created your keys, it will redraw the "Key" pane (see Figure 1b) to show you the public key and give you the opportunity to save both keys away.
Save your Private Key to Windows
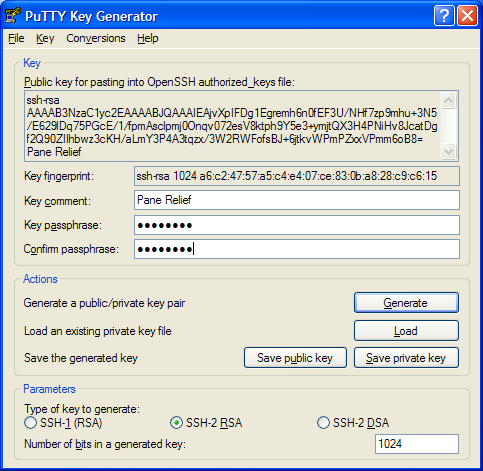
At this point, I want you to save your private key in a Windows file. Before you do that, though, you may wish to change the "Key comment" to something more meaningful than the default that PuTTYGen provides. In figure 1c, you can see that I changed the comment to read "Pane Relief"; you may choose to use your Windows user name or some other pithy identification string here. The comment doesn't matter, but it will be recorded on your public key, and logged by OpenSSH each time you log in. The comment is a handy way to distinguish which key let you in to your Linux system, if (and when) you have multiple keys.
Before you move on, you should also give the saved private key some security of it's own. If you enter a phrase in the "Key passphrase" (and "Confirm passphrase") box, Putty will not permit any access to your public key unless and until you enter the same password again. Essentially, a password or passphrase here prevents other Windows users from snooping and obtaining your private key. If they had this key, they could perform any SSH activity that they want, in your name.
Now, you are ready to click the "Save Private Key" button. As figure 1d shows, PuTTYGen will now show you a standard Windows File Save dialog, asking you for a filename and folder to save your private key in. All Putty private keys are stored as .PPK files, and the File Save window sets that value as the "Save as type" In the figure, I chose to save my private key in a file called "Pane Relief.PPK", in my personal "My Documents" folder.
Install your Public Key on Linux
Of course, the private key on Windows is of no use unless we also get the public key onto our Linux system. What we want is to get the public key displayed in the "Key" pane into a file called ~/.ssh/authorized_keys on our Linux box. There are many ways to do that, including placing the key in a Windows text file and FTPing it over to the Linux system, but I'll show you a "quick and dirty" way that uses the PuTTY terminal and a couple of text commands.
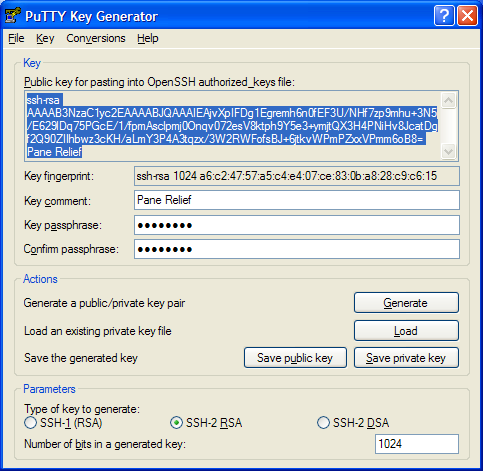
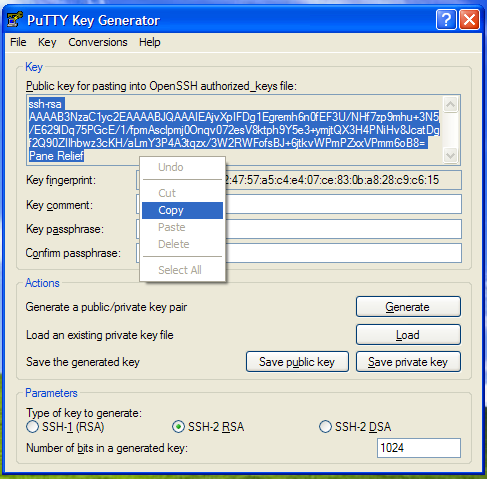
Before we exit PuTTYGen, we need to capture the public key shown in the top half of the "Key" pane and save it on our Linux system. As figure 1e and figure 1f shows, the public key is actually a text field that you can highlight and copy to your Windows clipboard. Once you've captured the public key, you'll have to save it away on your Linux system. For this, we need PuTTY again.
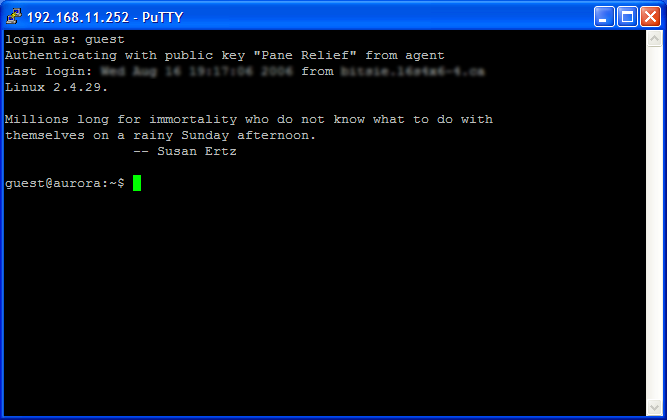
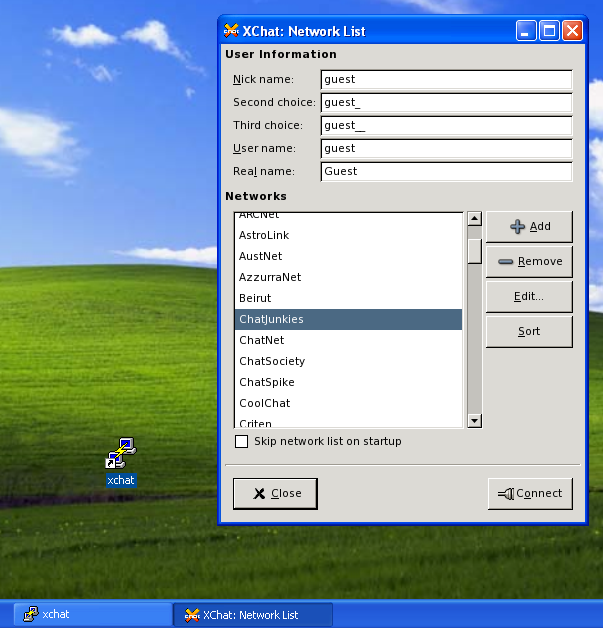
Open PuTTy (go to the Windows Start ⇒ All Programs ⇒ PuTTY menu, and select PuTTY) and connect to your Linux "safe haven" system3. For now, PuTTY will ask for your Linux userid and password because we haven't completed the setup that permits it to use your public and private keys yet.
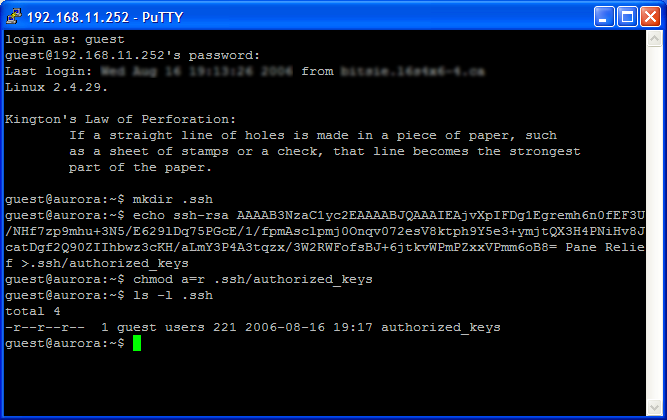
When you finish logging on to Linux, go to your home directory and find the .ssh directory. For the next part, you might want to take a quick look at figure 1g first, just as a reference. If the ~/.ssh directory doesn't exist, you will have to create it by executing the mkdir ~/.ssh command. Now, you need to save your public key (it's in the Windows clipboard, remember?) to a text file in the ~/.ssh directory. At the command prompt, first type echo (but do not hit enter yet). Next, type one space, then singleclick the right mouse button. This will paste the contents of the Windows clipboard into the PuTTY session, expanding your command to "echo ssh-rsa ......". Next, type another space, and follow it with the text >>~/.ssh/authorized_keys.
Your entire commandline should look something like
$ echo ssh-rsa xxxxxxxxxxxxxxxxxxxxxxx >>~/.ssh/authorized_keys
Now, hit enter. This echo command will append your public key to the end of the authorized_keys file in your directory. If that file didn't exist before the echo command, it will certainly exist after it, and will contain your PuTTY public key.
Disable OpenSSH userid/password logons
Of course, once all your Linux SSH users have switched to using public/private keypairs, you may want to change your OpenSSH setup to disable username/password authentication. Typically, Linux passwords are smaller and more predictable (and consequently weaker) than SSH keys, and are more vunerable to brute-force attacks. An internet-exposed SSH server quickly finds itself flooded with attempts to log in to each and every possible common userid with each and every possible common dictionary term as the password, and frequently, these attacks succeed. Since your Windows user now has a much more secure set of keys, you could just reconfigure your Linux OpenSSH to validate logins by only using the SSH key. This won't stop the attacks, but it will drastically reduce the chance that these attacks will succeed and let an unauthorized someone into your Linux system.
If you aren't concerned about this sort of exposure, you can skip this next part. Otherwise, it's off to Linux we go. You will have to log in as root, and make some minor adjustments to the OpenSSH configuration file in /etc/ssh/sshd_config.
In sshd_config, we will have to ensure that the PasswordAuthentication entry is set to no, to cause sshd to ignore "password" validation. Additionally, we set the PubkeyAuthentication entry to yes to cause sshd to authenticate using public keys. We can set the AuthorizedKeysFile to .ssh/authorized_keys, so that sshd will look in the user's ~/.ssh/authorized_keys for matching public keys.
Together, all these options will look like:
-
# Disable username/password authentication
PasswordAuthentication no

# Enable username/publickey authentication
PubkeyAuthentication yes

# Here's where we find the user's keys
AuthorizedKeysFile      .ssh/authorized_keys
Save these changes to /etc/ssh/sshd_config, restart your sshd server, and any new logons will use public-key logons instead of passworded logons.
"Buffer'n" your pain with PAGENT
If you intend only infrequent use of your Linux resources, you probably won't mind entering your PuTTY key passphrase for each connection you make. But, if you are anything like me, you don't intend on launching just one Linux application from Windows. If so, you would probably prefer to enter your passphrase only once instead of once per application. If so, then it's time to introduce you to the Pagent key agent.
PAGENT.EXE is PuTTY's key agent program. This program will collect your private keys and keep them ready for all of your PuTTY connections. Pagent acts as your agent, privately and securely supplying your private key to all those PuTTY tools that need it. You just give Pagent your PuTTY keys once (per Windows login), and Pagent takes care the rest.
From the Windows Start ⇒ All Programs ⇒ PuTTY menu, select Pagent. Pagent will start, and unobtrusively insert itself into the system tray area of your Windows Start bar (see Figure 2a). I find it handy to start Pagent automagically, so I have a link to it buried in my Windows Start ⇒ All Programs ⇒ StartUp menu along with a link to the Xming X server for Windows4. Pagent will start up quietly and sit patiently in your system tray, waiting for requests from PuTTY or instructions from you. It does not load keys unless and until you tell it to.
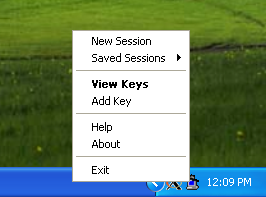
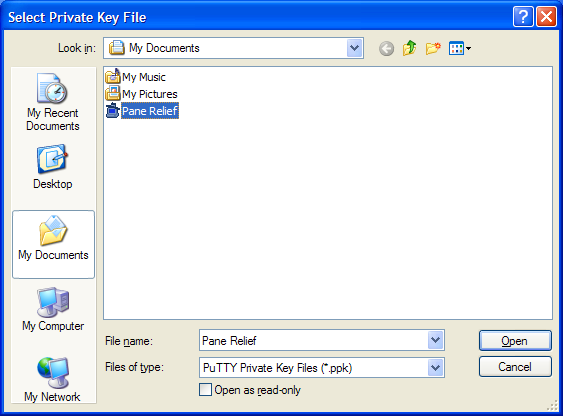
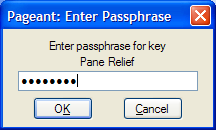
When you right-click on the Pagent system tray icon, you will see a menu of actions like in Figure 2b. When you select the Add Key option from the menu, Pagent will open a File Selection dialog (Figure 2c) and ask you to locate the PPK key file (or files) that you want it to use. In this window, you navigate to your "My Documents" folder (or where ever you stored your PuTTY key file) and select the PPK file for use. Pagent will ask for the passphrase and collect the private key for each PPK file you select (Figure 2d).
If this seems to be too much trouble, you can, instead, just use Explorer to locate your PPK key file (or files), and doubleclick on each of them. The file associations installed with PuTTY will cause Pagent to open it's "Add Key" dialog for each PuTTY key you launch.
When opening multiple PPK files protected with the same passphrase, Pagent will only ask for the common passphrase once. Now, when you launch PuTTY to connect to your Linux "safe haven", PuTTY will retrieve your key from Pagent instead of bothering you for a password (Figure 2e).
Instant relief - Only a click away
But, a faster linux logon isn't the remedy you need. You need a one-dose cure for your Windows "pane" and that's exactly what you will get. With all the preparation so far, the final cure is only a "shortcut" away.
Start X on Windows
Until now, every step you've taken has used a Windows program running on your computer. The last step in this "cure" will ultimately permit you to run Linux programs on a remote computer, and have those programs open their windows on your computer. To make this cure complete, we will run one more program on Windows, and create a Windows desktop shortcut. That shortcut, in conjunction with that last Windows program, will give you complete access to your remote Linux applications, straight off your Windows desktop.
The final Windows program that we have to use goes by the name "Xming". Xming is a port of the X.org X11 server to the Windows XP/Vista/7 environment, currently maintained by Colin Harrison who took over from Alexander Gottwald. The latest release of Xming (at the writing of this article) is based on the X.org X11R7.5 X server, and (like PuTTY) is released under an Open Source licence.
Before we continue on to the very last step, we will start the Xming server. From the Windows Start ⇒ All Programs ⇒ Xming menu, select Xming. The Xming X server will start up, and iconize itself into the system tray on your Windows Start bar, in the vicinity of the Pagent icon. As all your remaining interactions with your "Safe Haven" server will require a running X server on Windows, I suggest that you place a shortcut to Xming in your StartUp menu, so that X starts and runs in the background whenever you log on to Windows.
Make shortcuts to your X apps
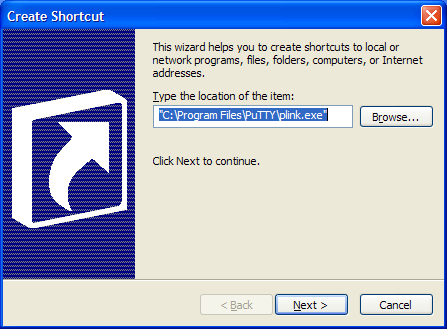
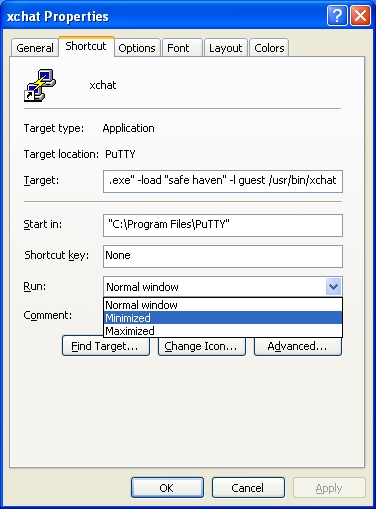
Pick an open spot on your desktop, right-click the mouse to get your desktop context menu, and select the "Create Shortcut" option. The first "Create Shortcut" wizard panel will ask you to locate the program you wish to launch. Here (see Figure 3a), you will fill in the complete path to your PuTTY PLINK.EXE program. You will find it in the same folder as your other PuTTY programs (usually C:\Program Files\PuTTY\PLINK.EXE).
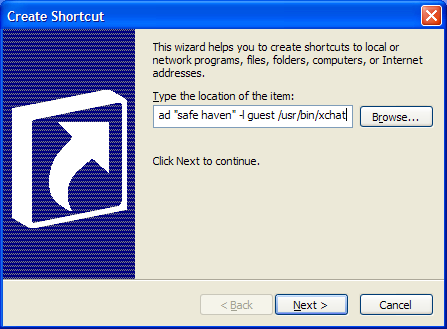
Don't click the "Next" button yet; we have more information to add to the programs commandline. Plink takes a number of options5 in its commandline that will facilitate the execution of "remote" programs. Notably, there are options to select the target PuTTy profile (-load profilename), supply the logon id to the target system (-l username), and select the target program to run. You can make the shortcut launch your favourite Linux X application, just by providing the full Linux path to that application in the PLINK commandline.
I want the Windows shortcut to start the xchat program for user "guest" on my Linux "Safe Haven" system, so my complete commandline, with all the options (see Figure 3b) reads
"C:\Program Files\PuTTY\plink.exe" -load "Safe Haven" -l guest /usr/bin/xchat.
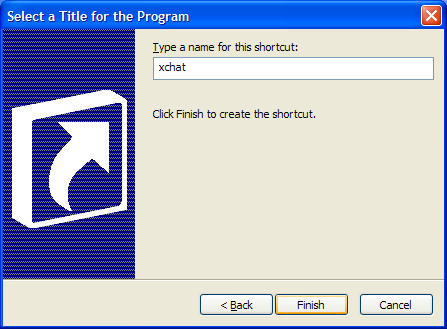
Now, once you have filled out your target options, you can click the Next button, which takes you to the shortcut "name" panel (see Figure 3c) . Here, you give the shortcut a meaningful name; I gave my xchat shortcut the very descriptive name "xchat".
At this point, you have a complete shortcut on your desktop. You can build as many different shortcuts this way as you have X applications you wish to run. Each shortcut would name a different X application, to be launched and run independently of any other X application.
If you doubleclick the icon (as I did in Figure 3d) the X window for the application will automagically appear on your desktop. (You did remember to start Xming as I suggested, didn't you?) You will notice that the shortcut opened two windows: the window for the target X application, and a second window for the PLINK program. This second window is a byproduct of how Windows handles running programs, and cant be closed while the X application is running.
However, this PLINK window can be minimized, to take it off of your desktop, and hide it from sight. So, let's go back and right-click on the xchat shortcut. and select it's Properties. In the Properties window, select the "Shortcut" tab, and look at the value in the "Run:" dropdown. Change this value from "Normal window" to "Minimized" (as in Figure 3e), and then click the OK button to save the change.
Now, when we doubleclick the xchat shortcut, the only window that opens directly on our desktop is the Xchat X window from our Linux system. Our xchat shortcut still opens a window (see Figure 3f), but that window is minimized to the Start bar, and out of our way. And so, we've got our Linux X application open on our Windows desktop without any commandline interaction.
Blessed "Pane" Relief
"My headache's gone. What a blessed relief!
With a few well-chosen FLOSS medicines, we've finally given our users some much needed "pane" releif from Microsoft Windows. Our prescription of an Xming X server, some PLINK shortcuts, and a PuTTY SSH key cured the "pane", and gave our users transparent access to their Linux GUI applications directly from their Windows desktops.
But, don't expect a doctor's bill; the treatment was covered in full by our Gnu-Linux insurance.
Footnotes
| [1] | "A Prisoner of Windows", Linux Gazette #129 - August, 2006, and reprinted here at JustLinux.ca |
| [2] | PuTTY, PuTTYGen, and Pagent are all open-source software for Windows, that come from http://www.chiark.greenend.org.uk/~sgtatham/putty/. A typical PuTTY install will create the Start menu shortcuts for you. |
| [3] | For the purposes of this article, I to refer to the remote Linux box as "safe haven". If this doesn't make sense to you, please take a look at "A Prisoner of Windows" and see how to configure PuTTY to log on to your Linux system. |
| [4] | Xming is an open-source X server for Windows based on the x.org X server. It is available free for download from http://www.straightrunning.com/XmingNotes/; see my previous article, "A Prisoner of Windows" for installation and setup instructions. I have Xming start up automatically through a Windows StartUp menu. This way, I don't have to remember to launch it before I run one of my X application shortcuts. |
| [5] | PLINK's commandline format is: plink [options] [user@]host [command]. Plink recognizes the following options: -V print version information and exit
-pgpfp print PGP key fingerprints and exit
-v show verbose messages
-load sessname Load settings from saved session
-ssh -telnet -rlogin -raw
force use of a particular protocol
-P port connect to specified port
-l user connect with specified username
-batch disable all interactive promptsThe following options only apply to SSH connections: -pw passw login with specified password
-D [listen-IP:]listen-port
Dynamic SOCKS-based port forwarding
-L [listen-IP:]listen-port:host:port
Forward local port to remote address
-R [listen-IP:]listen-port:host:port
Forward remote port to local address
-X -x enable / disable X11 forwarding
-A -a enable / disable agent forwarding
-t -T enable / disable pty allocation
-1 -2 force use of particular protocol version
-4 -6 force use of IPv4 or IPv6
-C enable compression
-i key private key file for authentication
-noagent disable use of Pageant
-agent enable use of Pageant
-m file read remote command(s) from file
-s remote command is an SSH subsystem (SSH-2 only)
-N don't start a shell/command (SSH-2 only)
-nc host:port
open tunnel in place of session (SSH-2 only)
|
Figures
Figures 1a - 1g: PuTTYGen
- Figure 1a: Initial PuTTYGen window
- Figure 1b: Completed PuTTYGen key generation
- Figure 1c: Added unique comment to "public" key
- Figure 1d: Saving private key

- Figure 1e: Select the public key for copy&paste
- Figure 1f: Copy the public key from PuTTYGen
- Figure 1g: Saving the PuTTY SSH public key on your Linux system
Figures 2a -2f: Pagent
- Figure 2a: Pagent icon (with black hat) in the system tray on the Start bar (Note the Xming X server icon just to the left of Pagent)

- Figure 2b: Pagent menu of actions
- Figure 2c: Selecting a PPK file in Pagent
- Figure 2d: Entering the passphrase
- Figure 2e: No more passwords!